Spring Boot provides several ways to perform data validation in your applications. Validation in Spring Boot is essential to ensure that the data your application receives or processes is valid and meets the required criteria.
Performing bean validation in Spring Boot is relatively straightforward, thanks to its built-in integration with the Bean Validation API (JSR-303/JSR-380). Here are the steps to perform bean validation in Spring Boot application:
1. Add Dependencies:
Ensure that you have the necessary dependencies in your project’s build file (usually pom.xml for Maven or build.gradle for Gradle). Spring Boot includes Hibernate Validator as its default Bean Validation provider.
For Maven, add the following dependency:
<dependency>
    <groupId>org.springframework.boot</groupId>
    <artifactId>spring-boot-starter-validation</artifactId>
</dependency>
For Gradle, add the following to your build.gradle:
implementation 'org.springframework.boot:spring-boot-starter-validation'2. Annotate Your Beans (entity or model class):
Annotate the fields of the beans you want to validate with appropriate annotations. Use spring validation annotations like @NotNull, @Size, @Email, (spring boot email validation) @Pattern, etc., to specify the validation rules for each field.
Example:
public class Supplier {
        private long supplierId;

	@NotBlank(message = "Supplier Name Should Be Not Blank")
	@Pattern(regexp = "^[a-zA-Z]+$",message = "Invalid Supplier Name")
	private String supplierName;


	@Size(min = 10,max = 10)
	@Pattern(regexp = "^[0-9]+$")
	private String supplierMobileNumber;

	@Valid
	private Address supplierAddress;

       //constructor
      // getter & setter
}
public class Address {
private long addressId;
@NotBlank(message = "City Name Should Not Be Blank")
@Pattern(regexp = "^[a-zA-Z]+$",message = "Invalid City Name")
private String city;
@NotBlank
@Pattern(regexp = "^[a-zA-Z]+$")
private String district;
@NotBlank
@Pattern(regexp = "^[a-zA-Z]+$")
private String state;
@Pattern(regexp = "^[0-9]+$")
@Size(min = 6,max = 6)
private String pinCode;
//constructor
// getter & setter
}3. Controller Method with @Valid Annotation:
In your controller methods or service methods that receive input data, use the @Valid annotation to trigger bean validation. Spring Boot will automatically validate the incoming data against the validation constraints defined in your beans.
@PostMapping("/supplier")
public ResponseEntity<Supplier> createSupplier(@Valid @RequestBody Supplier supplier) {
    // Handle supplier creation
}
4. Handling Validation Errors:
When validation fails, Spring Boot will throw a MethodArgumentNotValidException. You can handle this exception by creating an exception handler in your controller or using a global exception handler
You can create a global exception handler using @RestControllerAdvice to handle validation errors globally. This can be useful for returning consistent error responses.
Example:
@RestControllerAdvice
public class GlobalExceptionHandler {
    @ExceptionHandler(MethodArgumentNotValidException.class)
    @ResponseStatus(code = HttpStatus.BAD_REQUEST)
    public Map<String, Object> methodArgumentNotValid( MethodArgumentNotValidException ex) {
		Map<String, Object> errorMap=new HashMap<>();
		List<FieldError> fieldErrors = ex.getFieldErrors();
		for (FieldError fieldError : fieldErrors) {
			errorMap.put(fieldError.getField(), fieldError.getDefaultMessage());
		}
		return errorMap;

	}
}@GlobalExceptionHandler : The GlobalExceptionHandler is a class in a Spring Boot application that is used to handle exceptions globally. It allows you to centralize the handling of exceptions that may occur in various parts of your application and provide consistent error responses to clients.
@ExceptionHandler : Within the class, you define methods annotated with @ExceptionHandler to handle specific types of exceptions. These methods take the exception as a parameter and return an appropriate response.
MethodArgumentNotValidException, which is often used for handling validation errors.
Custom Error Response: It’s common to define a custom error response class (e.g., ErrorResponse) to structure the error information in a standardized way. This response class may include fields such as a message, timestamp, error code, and details about the error.
HTTP Status Codes: Exception handling methods often use the @ResponseStatus annotation to specify the HTTP status code that should be returned in the response. For example, you might use @ResponseStatus(HttpStatus.BAD_REQUEST) for validation errors.
5. Input: Validation In Spring Boot
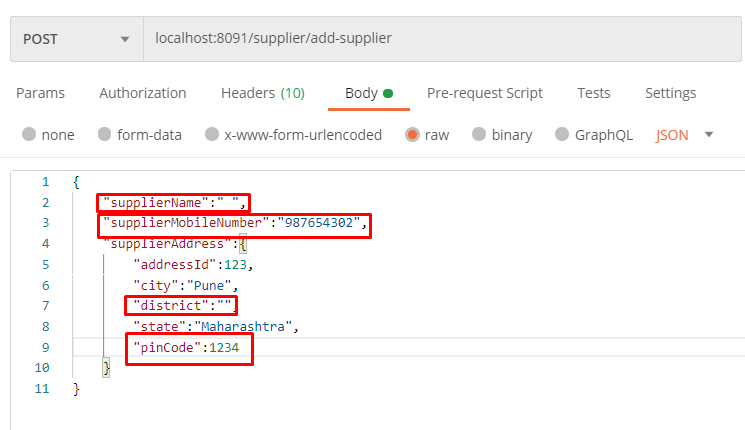
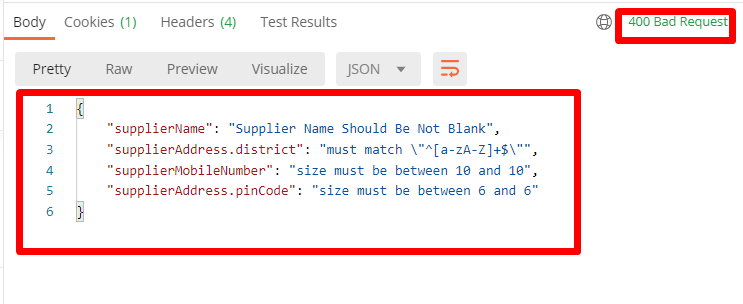
6. Custom annotation in Java for validation in Spring Boot
In a Spring Boot application, you can use custom annotations for validation by combining them with Spring’s validation framework. Here’s how you can create and use a custom validation annotation in a Spring Boot.
6.1 Create a custom validation annotation:
import javax.validation.Constraint;
import javax.validation.Payload;
import java.lang.annotation.*;

@Target({ElementType.FIELD, ElementType.PARAMETER})
@Retention(RetentionPolicy.RUNTIME)
@Constraint(validatedBy = MyValidationValidator.class)
public @interface MyValidation {
    String message() default "Validation failed"; // Default error message

    Class<?>[] groups() default {};

    Class<? extends Payload>[] payload() default {};

    int minValue() default 0;

    int maxValue() default Integer.MAX_VALUE;
}
6.2 Create a custom validator for your annotation:
import javax.validation.ConstraintValidator;
import javax.validation.ConstraintValidatorContext;

public class MyValidationValidator implements ConstraintValidator<MyValidation, Integer> {

    private int minValue;
    private int maxValue;

    @Override
    public void initialize(MyValidation annotation) {
        this.minValue = annotation.minValue();
        this.maxValue = annotation.maxValue();
    }

    @Override
    public boolean isValid(Integer value, ConstraintValidatorContext context) {
        if (value == null) {
            return true; // Null values are considered valid, handle null checks as needed
        }
        return value >= minValue && value <= maxValue;
    }
}
6.3 Use your custom annotation in a Spring component or controller:
import org.springframework.web.bind.annotation.*;

@RestController
public class MyController {

    @GetMapping("/validate")
    public String validateValue(@RequestParam @MyValidation(minValue = 10, maxValue = 100, message = "Value must be between 10 and 100") Integer value) {
        return "Valid value: " + value;
    }
}
In this example, we’ve created a custom validation annotation @MyValidation and a corresponding validator MyValidationValidator. The controller method validateValue uses the @MyValidation annotation to validate the input parameter value. If the validation fails, it returns a custom error message.

I really like your blog.. very nice colors & theme. Did you design this website yourself or did you hire someone to do it for you? Plz reply as I’m looking to create my own blog and would like to find out where u got this from. kudos
designed uding wordpress